
Control Resonant Weapons Guide: All Aberrant Forms & Stats
Control Resonant offers three starting Primary Aberrant forms: Strike, a fast-attacking weapon that deals 30-60 damage with a 30% innate Critical Chance; Glaive, a long-reach scythe-like form hitting multiple enemies for 70-90 damage; and Cleave, a consistent 65 damage axe that is strongest from behind. Secondary forms (Crush, Drill, Extend) are slower, more powerful, and apply the Falter debuff, while Living Shards bought from zone vendors unlock the forms you did not pick at the start.
Executive Overview: The Shapeshifting Entity
In Control Resonant, Dylan Faden's signature armament is the Aberrant—a sentient, paranatural shapeshifting weapon that replaces the Service Weapon wielded by Jesse Faden in the original Control. Its origin is the game's coldest story beat: seven years into the Oldest House lockdown, Jesse jams a strange metal rod into her comatose brother's chest before vanishing. That rod is Dylan's eventual weapon, and the first version of the Aberrant you receive is chosen entirely by you.
Transitioning the franchise from a third-person shooter into a momentum-based melee action RPG, the Aberrant fluidly morphs between Primary Forms selected at the very start of the Orientation mission and Secondary Forms granted by The Board after your first Arena Encounter in Manhattan. No matter which form you pick, Resonant keeps you engaging hostiles up close and personal, building momentum as you hurl yourself into enemy encounters.
Quick Answer: Pick your Primary form by playstyle, not by tier lists: Strike for fast critical pressure, Glaive for wide crowd control, Cleave for a consistent all-rounder that punishes flanking. Whatever you choose, you can change your selection at any point later in the game and unlock the other forms with Living Shards, so there is no wrong first pick.
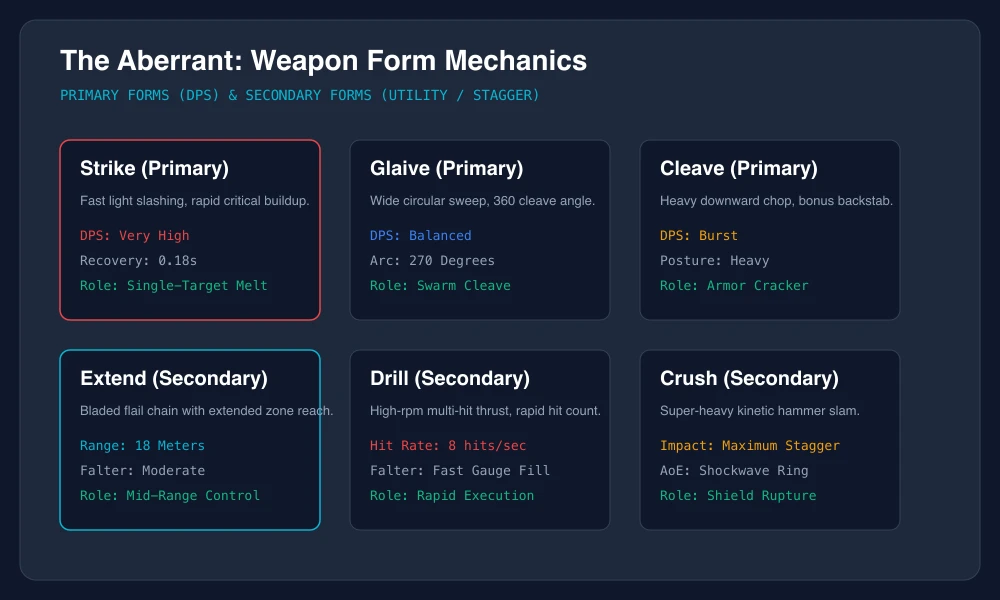
Complete Aberrant Weapon Forms: Damage Matrix
The three Primary forms and three Secondary forms below are the values documented in the official launch walkthroughs and community consensus. Every Secondary form is slower and more powerful than the Primaries and exists to apply Falter—the yellow posture bar that enables Executions.
| Form Name | Category | Damage | Attack Profile | Combat Signature |
|---|---|---|---|---|
| Strike | Primary | 30-60 damage | Fast attacks, close range | Innate 30% Critical Chance, the only starting form with inherent crit |
| Glaive | Primary | 70-90 damage | Medium speed, long reach | Hits multiple enemies at once while pushing them back for crowd control |
| Cleave | Primary | Consistent 65 damage | All-rounder, medium reach and speed | More effective when hitting enemies from behind |
| Crush | Secondary | 127-222 Blunt damage | Slow, powerful, chargeable hammer form | Deals 21-42 Falter; ideal against enemies with shields |
| Drill | Secondary | 95-280 Sharp damage | Faster, held charges drill enemies longer | Deals 0-21 Falter; ideal against softer targets weak to Sharp damage |
| Extend | Secondary | 63-127 Raw damage | Long-range, medium speed, multi-target arc | Charges to increase damage and Falter; Raw damage counters no specific resistance |
Primary Forms: Combat Fundamentals
1. Strike (Twin Daggers & Aberrant Cuts)
Strike is a fast-attacking twin-blade weapon built for players who deliver rapid Aberrant cuts in close quarters. Delivering fluid Aberrant cuts allows Dylan to hit quickly and dodge back before the enemy can retaliate. Its defining trait is the innate Critical Chance—community builds stacking a crit amulet with the skill tree's crit buffs report easily reaching a 55% crit rate, letting rapid Aberrant cuts annihilate single targets. The weapon is weaker per hit than the heavy hammers, but its sheer attack cadence makes up for the raw damage gap in aggressive hands, and later skill-tree buffs widen the crit ceiling further.
2. Glaive (Scythe / Greatsword Archetype)
The Glaive is the crowd-control pick: a scythe-like medium-speed weapon with a long reach that hits multiple enemies at once while pushing them back, ideal for grouping enemies for maximum impact. Players who chose it praise the range and note that its Falter output improves as the form is upgraded. The honest downside from community feedback: if a sector does not actually swarm you, single-target damage can feel low and the stagger cadence slower than Strike's.
3. Cleave (Axe / Sword Slash Archetype)
Cleave is the balanced all-rounder with medium reach and speed and a flat, predictable damage number. Cleave's precision Aberrant cuts deal more effective damage when hitting enemies from behind. Community players highlight its dodge-then-attack, which lifts an enemy into the air, and a hitbox generous enough to keep juggling lifted foes without jumping—both of which pair with several skills in the tree. A later upgrade path directly increases that back-attack damage, so investing in Cleave compounds its identity.
Secondary Forms: Falter, Damage Types & Pairing
Secondary forms are slower and more powerful than the Primaries, and they exist to build Falter. Falter behaves like a stamina bar under each enemy: when the yellow gauge fills, the foe is stunned and Dylan can unleash an Execution—an instant-kill flourish against standard enemies.
Damage type matters when pairing forms:
- Blunt (Crush): Charged hammer-style impact that is ideal against shielded enemies. Community feedback on the hammer archetype agrees: it is slow, but it does wonders breaking armor.
- Sharp (Drill): A held charge that drills enemies longer while applying Falter, ideal against softer targets weak to Sharp. Trailers showcased it as a multihit, damage-over-time shredder.
- Raw (Extend): A long-range, medium-speed arc that hits multiple targets in front of Dylan and charges up for more damage and Falter. It is excellent crowd control, but because it deals Raw damage it cannot exploit a specific weakness. Whip-style community advice applies here: you need to time the release for extra damage.
IGN's pairing suggestion is to balance archetypes: if you picked the fast, close-range Strike, pairing it with slow powerful Crush or long-range Extend covers the gaps. The broader community rule is to differentiate your two forms by damage type so your arsenal can answer both shielded and soft enemies.
Morph-Combo Playbooks From The Community
Combo 1: The Lift Chain (Cleave)
- Cleave dodge-then-attack lifts the target airborne.
- Follow with Cleave strikes; the hitbox reaches lifted enemies
  without needing to jump.
- Pair with skill-tree lifts and launch effects for juggle extensions.

Combo 2: The Critical Window (Strike)
- Execute a weakened enemy to trigger Keen from the Decisive Step-Up
  Talent, which raises melee Critical Chance for a short duration.
- Burn the window with rapid Strike light attacks on the next target.

Combo 3: The Zone Reset (Glaive + Extend)
- Glaive sweeps push and group peripheral enemies into a cluster.
- Morph to Extend and charge the multi-target arc for added damage
  and Falter before the regrouped enemies close in.

Combo 4: The Shield Cracker (Crush)
- Save Crush charges for shielded elites; Blunt damage is ideal
  against enemy barriers.
- After the shield breaks, swap to Drill to shred the now-soft target.
Living Shards & The Aberrant Upgrade Economy
Upgrading and unlocking Aberrant forms runs on several distinct resources, and confusing them wastes hours:
- Living Shards unlock additional primary and secondary forms. The fastest reliable sources are the vendors in each zone, which sell shards directly (you may need to raise the Vendor to level 2 stock first), and major or story missions, which award them as you follow the main plot.
- Aberrant Slivers are collected from Resource Crates and by completing World Feats, and feed directly into weapon upgrades.
- Source is the general currency of Control Resonant, exchanged at vendors for upgrade materials.
- Aberrant level is the hidden aggregate behind those three: upgrading every form, including ones you never equip, raises your overall Aberrant level and makes Dylan stronger overall, so Slivers spent on an unused form are not wasted.
- Defeating the first boss, The Artist, rewards one Living Shard, one Reset Item, and a large Source payout alongside an artifact Badge.
Upgrades sharpen the identity of your chosen form rather than erasing its weaknesses: Cleave's back-attack bonus can be increased by a later upgrade, and the game hands you additional weapons over time that cover the downsides of your starting pick. Players report that a single form's upgrade path is only a handful of upgrades deep, so spread shards deliberately.
The Gap: Where Forms Are Forged
All forging happens in The Gap, Dylan's astral home dimension, reachable at any time by holding down on the directional pad (G on keyboard). Inside you can upgrade weapons, unlock abilities, activate Artifacts, and freely reset skills to test builds. One rule is absolute: once you leave The Gap, your unlocked forms and abilities become permanent until you spend one of the limited Reset Items found in the world.
Weapon Anti-Patterns & Common Mistakes
- Treating the opening choice as permanent: You can change your form choice at any point later in the game, and you can unlock the other forms with Living Shards. Run with one pick long enough to feel it out before agonizing over the decision.
- Stacking two forms of the same damage type: A Blunt-heavy loadout stalls against soft Sharp-weak crowds, and a Raw Extend never counters resistances. Differentiate by damage type.
- Ignoring Falter entirely: Falter is the meta of the execution-driven combat system; players deliberately run Falter-heavy builds because stunning enemies to Execute them (and enter Dominance) drives both damage and healing through Health Elements.
- Chasing a "correct" tier: As one veteran player put it, you cannot seriously be looking for the meta in a single-player action game—pick the form that looks most fun and let the upgrade economy catch up.
Frequently Asked Questions
Can I equip more than one Secondary Form at a time?
Your active loadout is one Primary form plus one Secondary form, granted by The Board after your first Arena Encounter. You may re-pick both selections later, and additional forms are unlocked with Living Shards.
Is Strike weak in the late game?
Strike's per-hit damage is the lowest of the three starters, but its innate Critical Chance and fast combos scale with tree buffs, amulets, and post-Execution Keen states. Community crit-stack builds reach 55% crit rate and remain lethal into late Manhattan sectors.
Which form should a beginner choose?
Glaive if you want safety through reach and crowd control, Cleave if you want a consistent all-rounder that rewards positioning, and Strike if you actively enjoy fast dodge-and-rush pressure. All three are viable all the way through, and all three can be unlocked later regardless of your pick.
To wire these forms into Dylan's talent tree and Combat Abilities, consult our Combat Abilities & Talent Builds Guide. For the first boss that guards your way into Manhattan, review The Artist Boss Fight Strategy.